 如何构建Arduino供电的迷你复古游戏机
曾经想知道编写自己的复古游戏需要多少工作? Pong为Arduino编写代码有多容易?和我一起,向我展示如何构建Arduino供电的迷你复古游戏机,以及如何从头开始编写Pong。最终结果如下:
构建计划
这是一个相当简单的电路。 电位器(电位器)将控制游戏,而Arduino将会驱动OLED显示屏。这将在面包板上生产,但是您可能希望将其制成永久性电路并将其安装在箱子中。之前我们已经写过有关重新创建Pong的文章,但是今天我将向您展示如何从头开始编写代码,并分解每个部分。
您需要的内容
这是您需要的:
1 x Arduino(任何型号)
1 x 10k电位器
1 x 0.96英寸I2C OLED显示屏
1 x面包板
各种公头》公连接线
任何Arduino都应该工作,请查看我们的购买指南如果您不确定要购买哪种型号。
这些OLED显示器非常酷。通常可以购买白色,蓝色,黄色或这三种的混合物。它们确实是全彩色的,但是它们又增加了该项目的复杂性和成本。
电路
这是一个非常简单的电路。如果您对Arduino没有太多的经验,请先查看这些初学者项目。
在这里是:
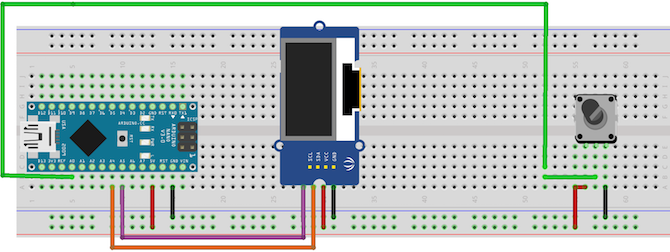
在锅的前面,将左引脚连接到 + 5V ,将右引脚连接到接地。将中间引脚连接到interwetten与威廉的赔率体系 引脚0 (A0)。
使用I2C协议连接OLED显示器。将 VCC 和 GND 连接到Arduino + 5V 和接地。将 SCL 连接到模拟五( A5 )。将 SDA 连接到模拟4 ( A4 )。它连接到模拟引脚的原因很简单。这些引脚包含I2C协议所需的电路。确保它们正确连接,并且没有交叉。确切的引脚会因型号而异,但是Nano和Uno会使用A4和A5。如果您未使用Arduino或Nano,请查看模型的Wire库文档。
电位器测试
上传此测试代码(请确保从中选择正确的电路板和端口工具》 面板和工具》 端口菜单):
void setup() {
// put your setup code here, to run once:
Serial.begin(9600); // setup serial
}
void loop() {
// put your main code here, to run repeatedly:
Serial.println(analogRead(A0)); // print the value from the pot
delay(500);
}
现在打开串行监视器(右上》 串行监视器)并转动锅。您应该看到在串行监视器上显示的值。完全逆时针应为零,完全逆时针应为 1023 :
您稍后会对此进行调整,但现在就可以了。如果什么也没有发生,或者您不做任何事情就改变了值,请断开并仔细检查电路。
OLED测试
OLED显示的配置稍微复杂一些。您需要安装两个库才能首先驱动显示。从Github下载Adafruit_SSD1306和Adafruit-GFX库。将文件复制到您的库文件夹中。这取决于您的操作系统:
Mac OS:/用户/用户名/Documents/Arduino/libraries
Linux:/home/Username/Sketchbook
Windows:/Users/Arduino/libraries
现在上传测试草图。转到文件》 示例》 Adafruit SSD1306 》 ssd1306_128x64_i2c 。这应该给您一个包含大量图形的大草图:
如果上传后没有任何反应,请断开连接并再次检查您的连接。如果示例不在菜单中,则可能需要重新启动Arduino IDE。
代码
现在是时候编写代码了。我将解释每个步骤,所以如果您只想使其运行,请跳到最后。这是相当数量的代码,因此,如果您不确定,请查看以下10个免费资源以学习编码。
首先包括必要的库:
#include
#include
#include
#include
SPI 和 WIRE 是用于处理I2C通信的两个Arduino库。 Adafruit_GFX 和 Adafruit_SSD1306 是您先前安装的库。
下一步,配置显示:
Adafruit_SSD1306 display(4);
然后设置运行游戏所需的所有变量:
int resolution[2] = {128, 64}, ball[2] = {20, (resolution[1] / 2)};
const int PIXEL_SIZE = 8, WALL_WIDTH = 4, PADDLE_WIDTH = 4, BALL_SIZE = 4, SPEED = 3;
int playerScore = 0, aiScore = 0, playerPos = 0, aiPos = 0;
char ballDirectionHori = ‘R’, ballDirectionVerti = ‘S’;
boolean inProgress = true;
这些变量存储运行游戏所需的所有数据。其中一些存储球的位置,屏幕的大小,球员的位置等。请注意其中的一些是 const 的意思,它们是恒定的,并且永远不会改变。
屏幕分辨率和焊球位置存储在数组中。数组是相似事物的集合,对于球,存储坐标( X 和 Y )。访问数组中的元素很容易(不要在文件中包含此代码):
resolution[1];
由于数组从零开始,因此将返回分辨率数组中的第二个元素( 64 )。更新元素甚至更容易(同样,不包含此代码):
ball[1] = 15;
在 void setup()内,配置显示:/p》 void setup() {
display.begin(SSD1306_SWITCHCAPVCC, 0x3C);
display.display();
}
第一行告诉Adafruit库,您的显示器正在使用什么尺寸和通讯协议(在这种情况下,为 128 x 64 和 I2C )。第二行( display.display())告诉屏幕显示缓冲区中存储的内容(无内容)。
创建两个名为 drawBall 和 eraseBall :
void drawBall(int x, int y) {
display.drawCircle(x, y, BALL_SIZE, WHITE);
}
void eraseBall(int x, int y) {
display.drawCircle(x, y, BALL_SIZE, BLACK);
}
这些采用 x 和 y 坐标并使用显示库中的 drawCircle 方法将其绘制在屏幕上。这使用了前面定义的常量 BALL_SIZE 。尝试更改此设置,看看会发生什么。此drawCircle方法接受像素颜色-黑色或白色。因为这是单色显示(一种颜色),所以白色表示像素处于打开状态,黑色表示像素处于关闭状态。
现在创建一种称为 moveAi 的方法:
void moveAi() {
eraseAiPaddle(aiPos);
if (ball[1] 》 aiPos) {
++aiPos;
}
else if (ball[1] 《 aiPos) {
--aiPos;
}
drawAiPaddle(aiPos);
}
此方法处理移动人工智能或 AI 播放器。这是一个非常简单的计算机对手-如果球在桨上方,请向上移动。它在桨下面,向下移动。很简单,但是效果很好。增量和减量符号( ++ aiPos 和 –aiPos )用于从aiPosition中添加或减去一个。您可以添加或减去更大的数字以使AI更快地移动,因此更难以克服。这样做的方法如下:
aiPos += 2;
并且:
aiPos -= 2;
加号等于和负号符号是aiPos当前值加/减两个的简写。这是另一种方法:
aiPos = aiPos + 2;
和
aiPos = aiPos - 1;
注意此方法如何首先擦除桨,并且然后再次绘制。必须这样做。如果绘制了新的桨叶位置,则屏幕上将有两个重叠的桨叶。
drawNet 方法使用两个循环绘制球网:
void drawNet() {
for (int i = 0; i 《 (resolution[1] / WALL_WIDTH); ++i) {
drawPixel(((resolution[0] / 2) - 1), i * (WALL_WIDTH) + (WALL_WIDTH * i), WALL_WIDTH);
}
}
这将使用 WALL_WIDTH 变量来设置其大小。
创建名为 drawPixels 和的方法擦除像素。就像球形方法一样,两者之间的唯一区别是像素的颜色:
void drawPixel(int posX, int posY, int dimensions) {
for (int x = 0; x 《 dimensions; ++x) {
for (int y = 0; y 《 dimensions; ++y) {
display.drawPixel((posX + x), (posY + y), WHITE);
}
}
}
void erasePixel(int posX, int posY, int dimensions) {
for (int x = 0; x 《 dimensions; ++x) {
for (int y = 0; y 《 dimensions; ++y) {
display.drawPixel((posX + x), (posY + y), BLACK);
}
}
}
再次,这两种方法都使用两个 》循环绘制一组像素。循环不必使用库 drawPixel 方法绘制每个像素,而是根据给定的尺寸绘制一组像素。
drawScore 方法使用库的文本功能将播放器和AI得分写入屏幕。这些存储在 playerScore 和 aiScore 中:
void drawScore() {
display.setTextSize(2);
display.setTextColor(WHITE);
display.setCursor(45, 0);
display.println(playerScore);
display.setCursor(75, 0);
display.println(aiScore);
}
此方法还具有 eraseScore 对应,将像素设置为黑色或关闭。
最后四种方法非常相似。他们绘制并擦除了玩家和AI球拍:
void erasePlayerPaddle(int row) {
erasePixel(0, row - (PADDLE_WIDTH * 2), PADDLE_WIDTH);
erasePixel(0, row - PADDLE_WIDTH, PADDLE_WIDTH);
erasePixel(0, row, PADDLE_WIDTH);
erasePixel(0, row + PADDLE_WIDTH, PADDLE_WIDTH);
erasePixel(0, row + (PADDLE_WIDTH + 2), PADDLE_WIDTH);
}
注意他们如何调用之前创建的 erasePixel 方法。这些方法会绘制并擦除适当的桨。
主循环中还有更多逻辑。这是完整的代码:
#include
#include
#include
#include
Adafruit_SSD1306 display(4);
int resolution[2] = {128, 64}, ball[2] = {20, (resolution[1] / 2)};
const int PIXEL_SIZE = 8, WALL_WIDTH = 4, PADDLE_WIDTH = 4, BALL_SIZE = 4, SPEED = 3;
int playerScore = 0, aiScore = 0, playerPos = 0, aiPos = 0;
char ballDirectionHori = ‘R’, ballDirectionVerti = ‘S’;
boolean inProgress = true;
void setup() {
display.begin(SSD1306_SWITCHCAPVCC, 0x3C);
display.display();
}
void loop() {
if (aiScore 》 9 || playerScore 》 9) {
// check game state
inProgress = false;
}
if (inProgress) {
eraseScore();
eraseBall(ball[0], ball[1]);
if (ballDirectionVerti == ‘U’) {
// move ball up diagonally
ball[1] = ball[1] - SPEED;
}
if (ballDirectionVerti == ‘D’) {
// move ball down diagonally
ball[1] = ball[1] + SPEED;
}
if (ball[1] 《= 0) { // bounce the ball off the top ballDirectionVerti = ‘D’; } if (ball[1] 》= resolution[1]) {
// bounce the ball off the bottom
ballDirectionVerti = ‘U’;
}
if (ballDirectionHori == ‘R’) {
ball[0] = ball[0] + SPEED; // move ball
if (ball[0] 》= (resolution[0] - 6)) {
// ball is at the AI edge of the screen
if ((aiPos + 12) 》= ball[1] && (aiPos - 12) 《= ball[1]) { // ball hits AI paddle if (ball[1] 》 (aiPos + 4)) {
// deflect ball down
ballDirectionVerti = ‘D’;
}
else if (ball[1] 《 (aiPos - 4)) {
// deflect ball up
ballDirectionVerti = ‘U’;
}
else {
// deflect ball straight
ballDirectionVerti = ‘S’;
}
// change ball direction
ballDirectionHori = ‘L’;
}
else {
// GOAL!
ball[0] = 6; // move ball to other side of screen
ballDirectionVerti = ‘S’; // reset ball to straight travel
ball[1] = resolution[1] / 2; // move ball to middle of screen
++playerScore; // increase player score
}
}
}
if (ballDirectionHori == ‘L’) {
ball[0] = ball[0] - SPEED; // move ball
if (ball[0] 《= 6) { // ball is at the player edge of the screen if ((playerPos + 12) 》= ball[1] && (playerPos - 12) 《= ball[1]) { // ball hits player paddle if (ball[1] 》 (playerPos + 4)) {
// deflect ball down
ballDirectionVerti = ‘D’;
}
else if (ball[1] 《 (playerPos - 4)) { // deflect ball up ballDirectionVerti = ‘U’; } else { // deflect ball straight ballDirectionVerti = ‘S’; } // change ball direction ballDirectionHori = ‘R’; } else { ball[0] = resolution[0] - 6; // move ball to other side of screen ballDirectionVerti = ‘S’; // reset ball to straight travel ball[1] = resolution[1] / 2; // move ball to middle of screen ++aiScore; // increase AI score } } } drawBall(ball[0], ball[1]); erasePlayerPaddle(playerPos); playerPos = analogRead(A2); // read player potentiometer playerPos = map(playerPos, 0, 1023, 8, 54); // convert value from 0 - 1023 to 8 - 54 drawPlayerPaddle(playerPos); moveAi(); drawNet(); drawScore(); } else { // somebody has won display.clearDisplay(); display.setTextSize(4); display.setTextColor(WHITE); display.setCursor(0, 0); // figure out who if (aiScore 》 playerScore) {
display.println(“YOU LOSE!”);
}
else if (playerScore 》 aiScore) {
display.println(“YOU WIN!”);
}
}
display.display();
}
void moveAi() {
// move the AI paddle
eraseAiPaddle(aiPos);
if (ball[1] 》 aiPos) {
++aiPos;
}
else if (ball[1] 《 aiPos) {
--aiPos;
}
drawAiPaddle(aiPos);
}
void drawScore() {
// draw AI and player scores
display.setTextSize(2);
display.setTextColor(WHITE);
display.setCursor(45, 0);
display.println(playerScore);
display.setCursor(75, 0);
display.println(aiScore);
}
void eraseScore() {
// erase AI and player scores
display.setTextSize(2);
display.setTextColor(BLACK);
display.setCursor(45, 0);
display.println(playerScore);
display.setCursor(75, 0);
display.println(aiScore);
}
void drawNet() {
for (int i = 0; i 《 (resolution[1] / WALL_WIDTH); ++i) {
drawPixel(((resolution[0] / 2) - 1), i * (WALL_WIDTH) + (WALL_WIDTH * i), WALL_WIDTH);
}
}
void drawPixel(int posX, int posY, int dimensions) {
// draw group of pixels
for (int x = 0; x 《 dimensions; ++x) {
for (int y = 0; y 《 dimensions; ++y) {
display.drawPixel((posX + x), (posY + y), WHITE);
}
}
}
void erasePixel(int posX, int posY, int dimensions) {
// erase group of pixels
for (int x = 0; x 《 dimensions; ++x) {
for (int y = 0; y 《 dimensions; ++y) {
display.drawPixel((posX + x), (posY + y), BLACK);
}
}
}
void erasePlayerPaddle(int row) {
erasePixel(0, row - (PADDLE_WIDTH * 2), PADDLE_WIDTH);
erasePixel(0, row - PADDLE_WIDTH, PADDLE_WIDTH);
erasePixel(0, row, PADDLE_WIDTH);
erasePixel(0, row + PADDLE_WIDTH, PADDLE_WIDTH);
erasePixel(0, row + (PADDLE_WIDTH + 2), PADDLE_WIDTH);
}
void drawPlayerPaddle(int row) {
drawPixel(0, row - (PADDLE_WIDTH * 2), PADDLE_WIDTH);
drawPixel(0, row - PADDLE_WIDTH, PADDLE_WIDTH);
drawPixel(0, row, PADDLE_WIDTH);
drawPixel(0, row + PADDLE_WIDTH, PADDLE_WIDTH);
drawPixel(0, row + (PADDLE_WIDTH + 2), PADDLE_WIDTH);
}
void drawAiPaddle(int row) {
int column = resolution[0] - PADDLE_WIDTH;
drawPixel(column, row - (PADDLE_WIDTH * 2), PADDLE_WIDTH);
drawPixel(column, row - PADDLE_WIDTH, PADDLE_WIDTH);
drawPixel(column, row, PADDLE_WIDTH);
drawPixel(column, row + PADDLE_WIDTH, PADDLE_WIDTH);
drawPixel(column, row + (PADDLE_WIDTH * 2), PADDLE_WIDTH);
}
void eraseAiPaddle(int row) {
int column = resolution[0] - PADDLE_WIDTH;
erasePixel(column, row - (PADDLE_WIDTH * 2), PADDLE_WIDTH);
erasePixel(column, row - PADDLE_WIDTH, PADDLE_WIDTH);
erasePixel(column, row, PADDLE_WIDTH);
erasePixel(column, row + PADDLE_WIDTH, PADDLE_WIDTH);
erasePixel(column, row + (PADDLE_WIDTH * 2), PADDLE_WIDTH);
}
void drawBall(int x, int y) {
display.drawCircle(x, y, BALL_SIZE, WHITE);
}
void eraseBall(int x, int y) {
display.drawCircle(x, y, BALL_SIZE, BLACK);
}
这是您最终得到的结果:
对代码很有信心,您可以进行许多修改:
添加难度级别菜单(更改AI和球速)。
向其中添加一些随机移动
为两个玩家添加另一个底池。
添加一个暂停按钮。
现在看看这些复古游戏Pi Zero项目。
责任编辑:wv
-
游戏机
+关注
关注
9文章
299浏览量
33428 -
Arduino
+关注
关注
188文章
6468浏览量
186847
发布评论请先 登录
相关推荐
索尼PS5 Pro游戏机震撼发布
基于 FPGA 的飞机大战游戏系统设计
微软开发者成功在任天堂 NES 游戏机上运行.NET
索尼或将于近期公布PS5 Pro游戏机及《宇宙机器人》新作发布日期
开源DIY!用 ESP32 制造迷你复古小电视
YXC可编程振荡器,频点22.578MHz,工作电压3.3V,应用于游戏机
任天堂Switch初代游戏机模拟运行Windows 11 ARM效果展示
精选推荐!看大佬用树莓派4做个迷你版PS5
Funkey游戏机新作,基于全志T113的全新版本
开源项目!做一台基于 ESP32 DIY 复古游戏机
OrangePi Neo:好玩不贵,最具性价比的游戏掌机来了!

做一台基于 ESP32 DIY 复古游戏机——MicroByte
任天堂计划2025年3月发布Switch 2游戏机
家用游戏机的控制器接口类型
应用在游戏机触摸屏中的触摸感应芯片


 工商网监
工商网监
评论