 山石防火墙双机热备模式配置案例
1. 需求分析
配置HA Active- Active[1]工作模式,以提高网络可靠性,保证业务不中断。
本案例将分别演示WebUI和CLI两种配置方式。
2. 案例说明
2.1 环境说明
在配置之前,确认搭建成HA典型组网模式的两台Hillstone设备采用完全相同的硬件平台、固件版本和安装相同的许可证,并且两台设备使用同样的接口连接到网络。
2.2 软硬件信息
| 硬件平台 | 软件版本 |
| SG-6000-E1100 | SG6000-M-3-5.5R8P5-v6.bin |
| SG-6000-E1100 | SG6000-M-3-5.5R8P5-v6.bin |
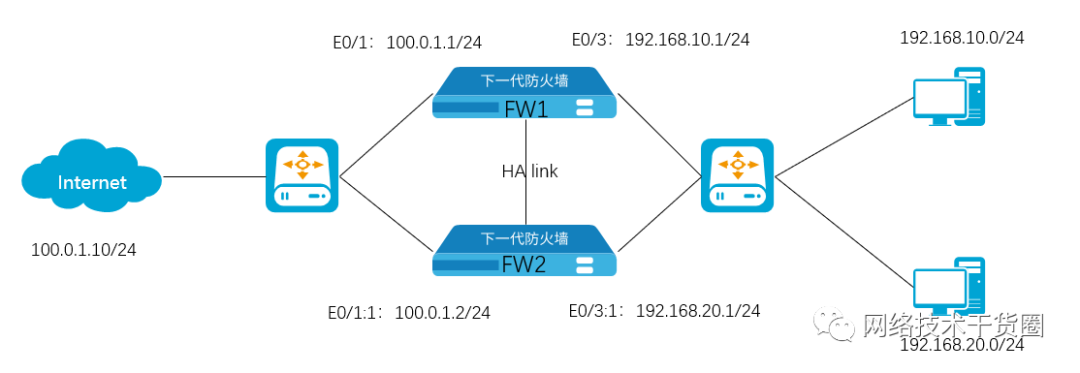
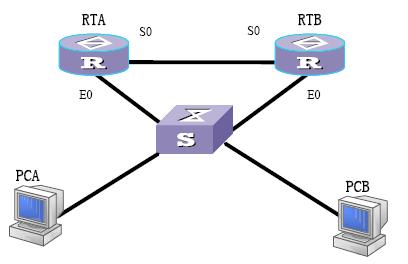
2.3 组网拓扑
3. 功能配置
3.1 WebUI配置步骤
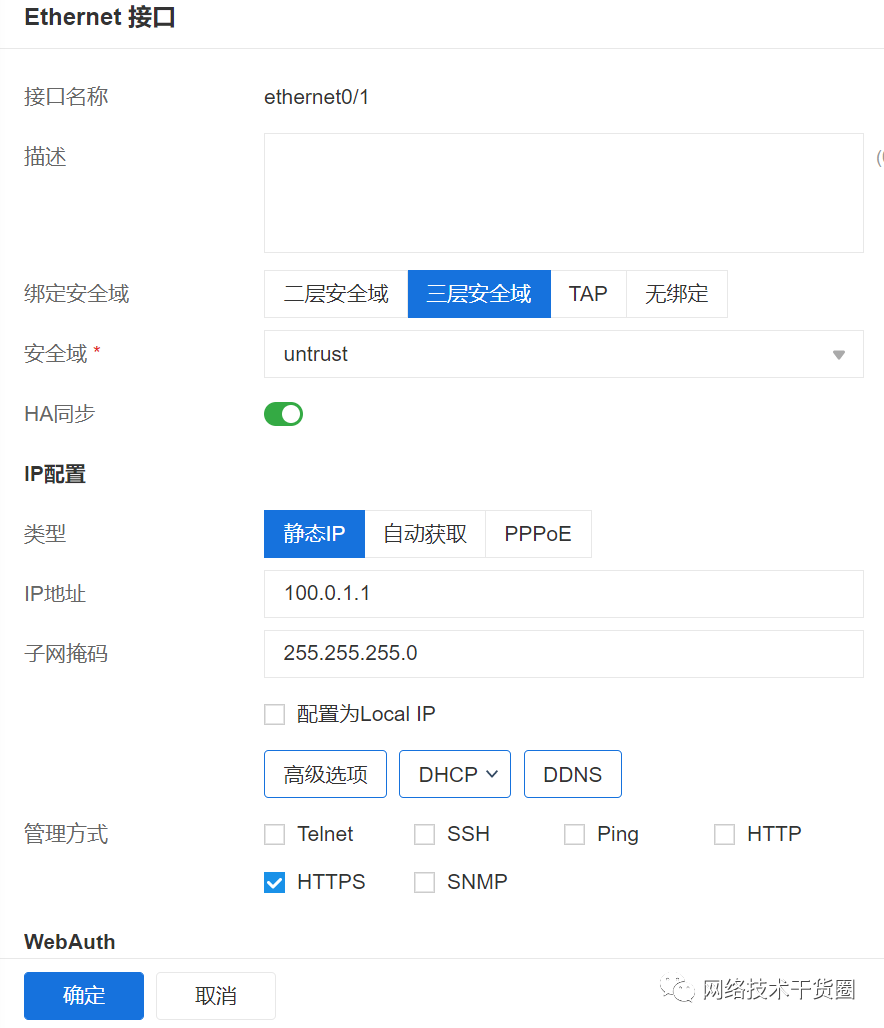
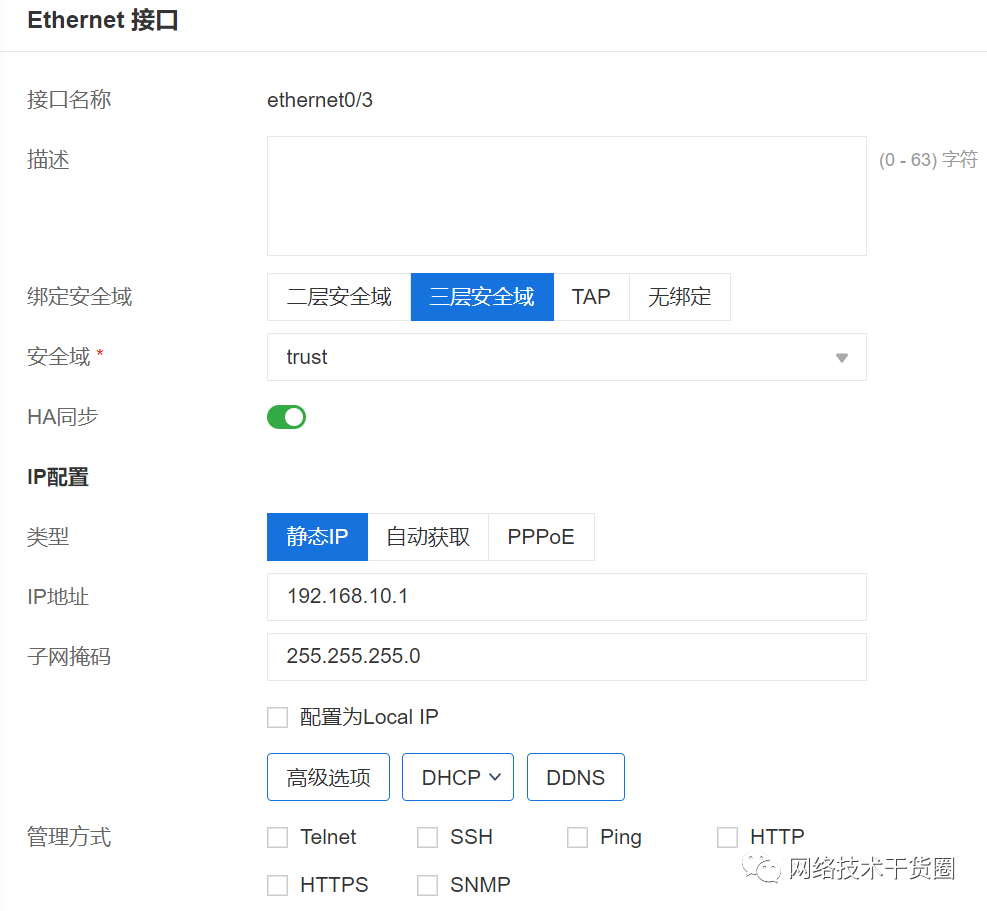
FW1接口配置,ethernet0/1为外网出接口,ethernet0/3为内网口。
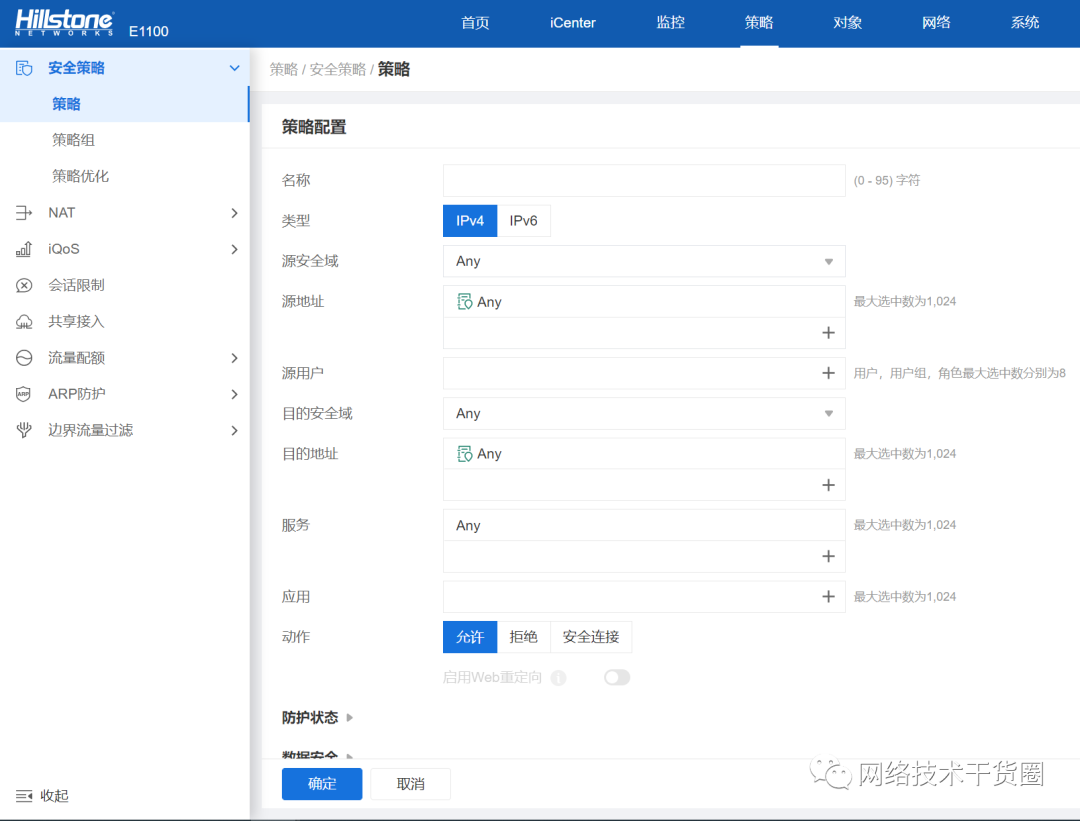
配置安全策略。
配置检测对象,建议同时监测内网口和外网口(本案例只监测外网口)。

配置FW1,group0为主,group1为备(配置 ha link 和 HA group并调用检测对象)。(系统->HA)


配置FW2,group0为备,group1为主。

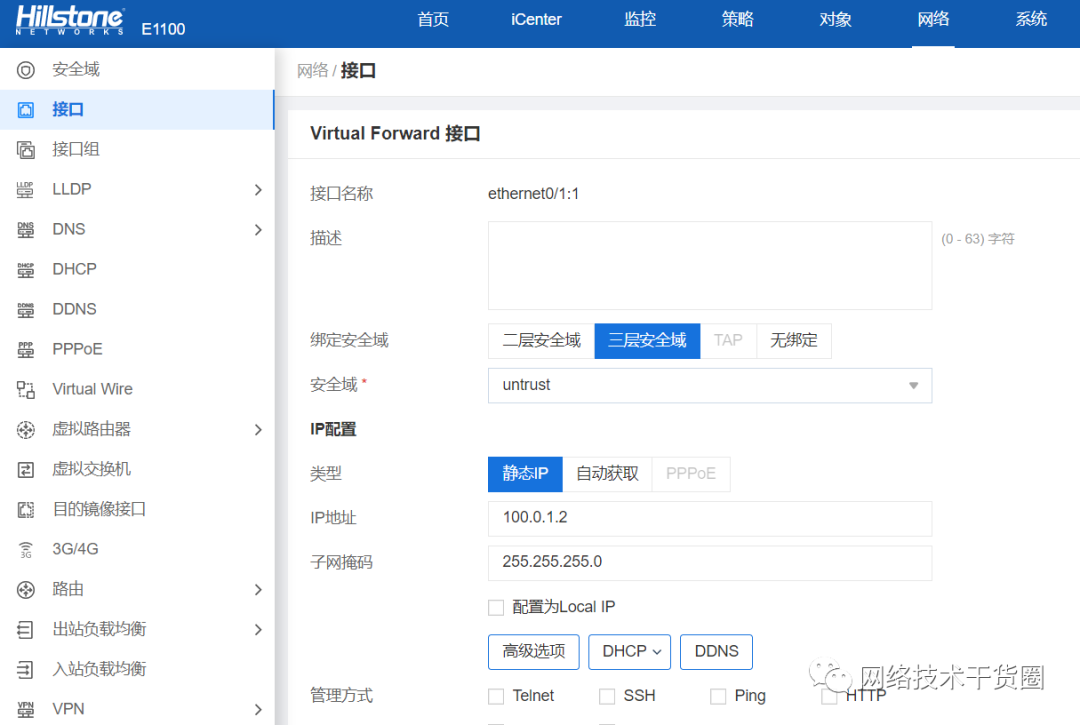
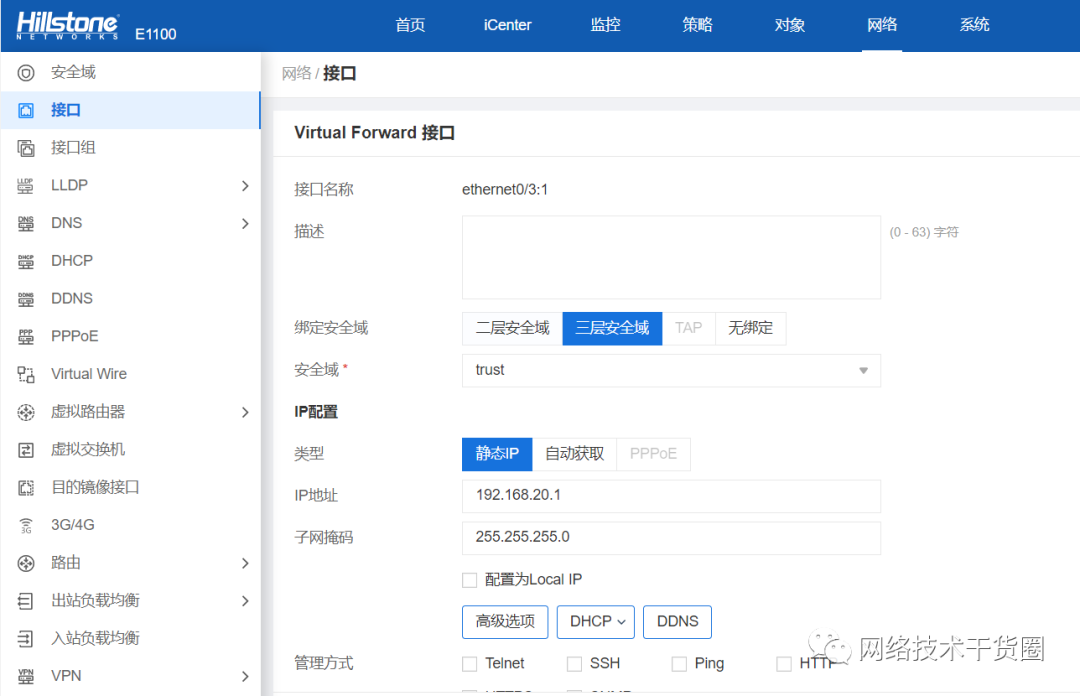
配置FW1上为group 1所生成的VFI接口。
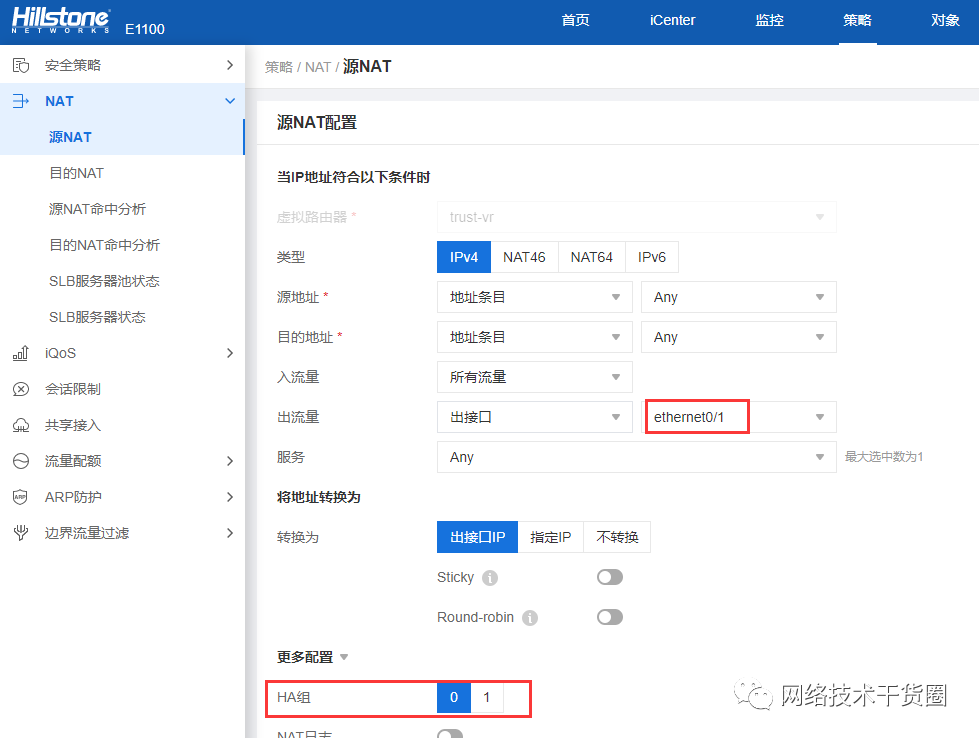
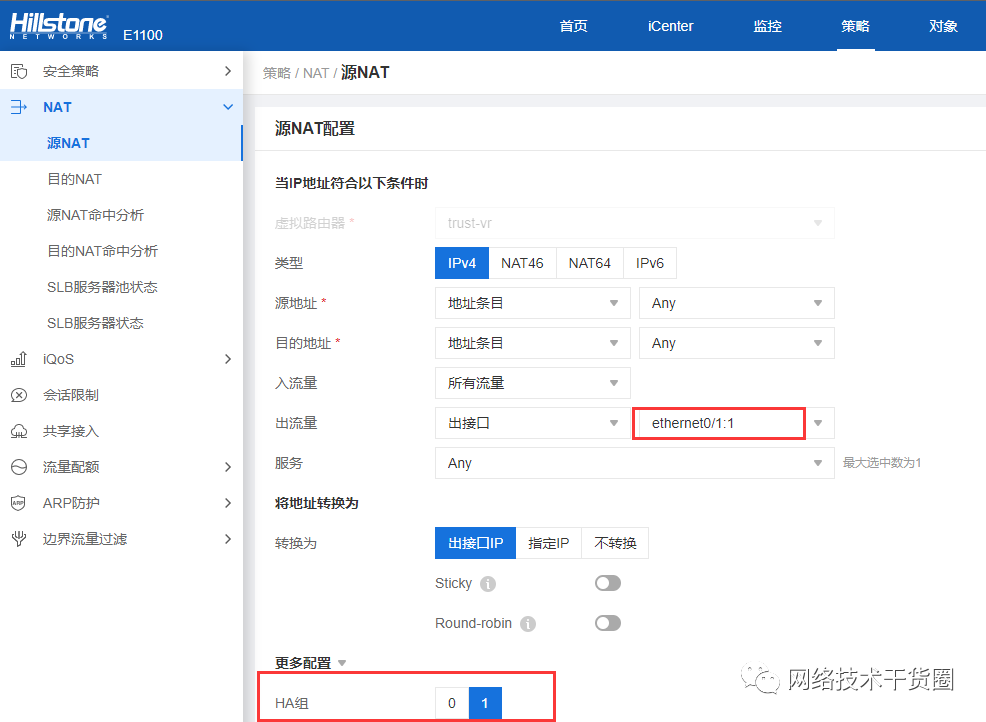
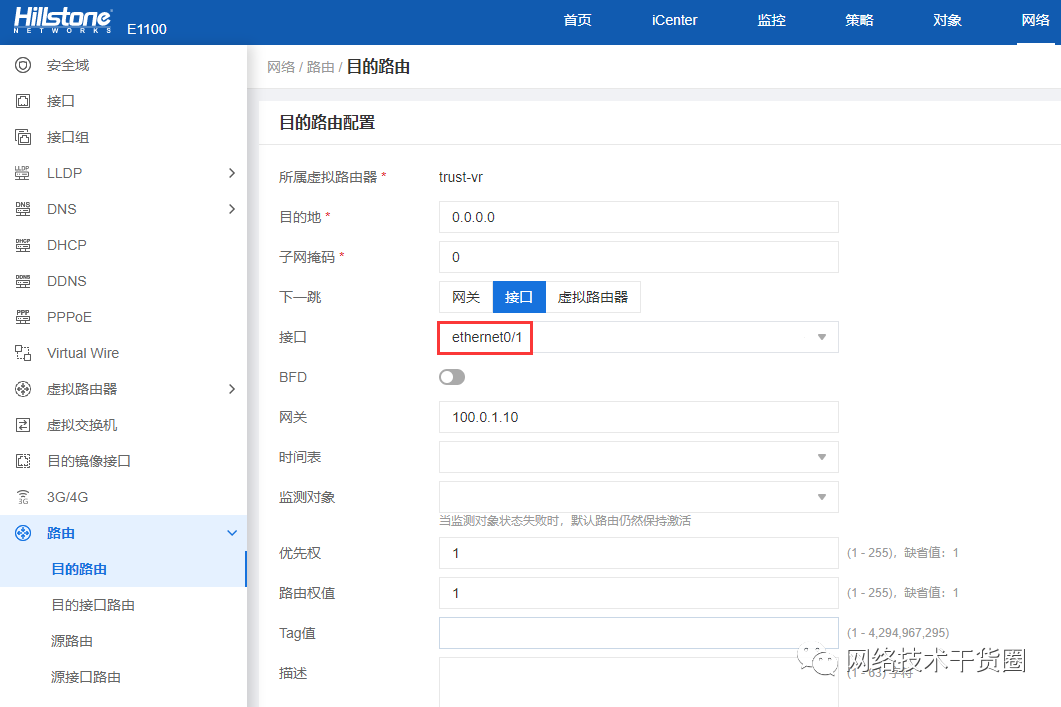
配置FW1的SNAT和目的路由。
FW1,FW2分别配置HA簇,开启HA功能。

配置完成后,点击“系统 > 系统信息”,两台设备的HA状态分别如下显示:
FW1:
FW2:

3.2 CLI配置步骤
• 配置FW1 ,group 0 为 主, group 1 为备。
FW1(config)#interfaceethernet0/1
FW1(config-if-eth0/2)#zoneuntrust
FW1(config-if-eth0/2)#ipaddress100.0.1.1/24
FW1(config-if-eth0/2)#exit
FW1(config)#interfaceethernet0/3
FW1(config-if-eth0/0)#zonetrust
FW1(config-if-eth0/0)#ipaddress192.168.10.1/24
FW1(config-if-eth0/0)#exit
FW1(config)#policy-global
FW1(config-policy)#rulefromanytoanyserviceanypermit
FW1(config-policy)#exit
FW1(config)#
配置track
FW1(config)#tracktrackobj1
FW1(config-trackip)#interfaceethernet0/3weight255
FW1(config-trackip)#interfaceethernet0/1weight255
FW1(config-trackip)#exit
FW1(config)#
FW1(config)#tracktrackobj2
FW1(config-trackip)#interfaceethernet0/3weight255
FW1(config-trackip)#interfaceethernet0/1weight255
FW1(config-trackip)#exit
FW1(config)#
配置halink和HAgroup
FW1(config)#halinkinterfaceethernet0/4
FW1(config)#halinkip1.1.1.1/24
FW1(config)#hagroup0
FW1(config-ha-group)#priority50
FW1(config-ha-group)#preempt5
FW1(config-ha-group)#monitortracktrackobj1
FW1(config-ha-group)#exit
FW1(config)#hagroup1
FW1(config-ha-group)#priority100
FW1(config-ha-group)#monitortracktrackobj2
FW1(config-ha-group)#exit
• 配置 FW2 , group 0为 备 ,group 1 为 主 。
FW1(config)#halinkinterfaceethernet0/4
FW1(config)#halinkip1.1.1.2/24
FW2(config)#hagroup0
FW2(config-ha-group)#priority100
FW2(config-ha-group)#exit
FW2(config)#hagroup1
FW2(config-ha-group)#priority50
FW2(config-ha-group)#exit
• 配置 FW1 上为 group 1 所生成的 VFI 接口。
VFI(VirtualForwardInterface)接口就是专为HAgroup1所用
FW1(config)#interfaceethernet0/3:1
FW1(config-if-eth0/1:1)#zonetrust
FW1(config-if-eth0/1:1)#ipaddress192.168.20.1/24
FW1(config-if-eth0/1:1)#exit
FW1(config)#interfaceethernet0/1:1
FW1(config-if-eth0/3:1)#zoneuntrust
FW1(config-if-eth0/3:1)#ipaddress100.0.1.2/24
FW1(config-if-eth0/3:1)#exit
FW1(config)#ipvroutertrust-vr
FW1(config-vrouter)#snatrulefromanytoanyeifethernet0/1trans-toeif-ipmodedynamicport
FW1(config-vrouter)#snatrulefromanytoanyeifethernet0/1:1trans-toeif-ipmodedynamicportgroup1
FW1(config-vrouter)#iproute0.0.0.0/0ethernet0/1100.0.1.10
FW1(config-vrouter)#iproute0.0.0.0/0ethernet0/1:1100.0.1.10
FW1(config-vrouter)#exit
• 配置 HA 簇开启HA 功能,等待配置同步。
FW1(config)#hacluster1
FW2(config)#hacluster1
• 查看HA协商结果。
FW1#showhagroup0
FW1#showhagroup1
FW2#showhagroup0
FW2#showhagroup1
审核编辑:汤梓红
-
接口
+关注
关注
33文章
8582浏览量
151065 -
防火墙
+关注
关注
0文章
417浏览量
35609 -
网络
+关注
关注
14文章
7560浏览量
88748
原文标题:3. 功能配置
文章出处:【微信号:网络威廉希尔官方网站 干货圈,微信公众号:网络威廉希尔官方网站 干货圈】欢迎添加关注!文章转载请注明出处。
发布评论请先 登录
相关推荐


 工商网监
工商网监
评论